Deploy Sample Apps
The Envoy Sidecar
As mentioned during the Istio architecture overview, in order to take advantage of all of Istio’s features pods must be running an Istio sidecar proxy.
Istio offers two ways injecting the Istio sidecar into a pod:
-
Manually using the
istioctlcommand.Manual injection directly modifies configuration, like deployments, and injects the proxy configuration into it.
-
Automatically using the Istio sidecar injector.
You will still need to manually enable Istio in each namespace that you want to be managed by Istio.
We will install the Bookinfo application inside its own namespace and allow Istio to automatically inject the Sidecar Proxy.
kubectl create namespace bookinfo
kubectl label namespace bookinfo istio-injection=enabled

 kubectl get ns bookinfo --show-labels
Now, we can deploy a vanilla definition of the Bookinfo application inside the bookinfo namespace, and the Mutating Webhook will alter the definition of any pod it sees to include the Envoy sidecar container.
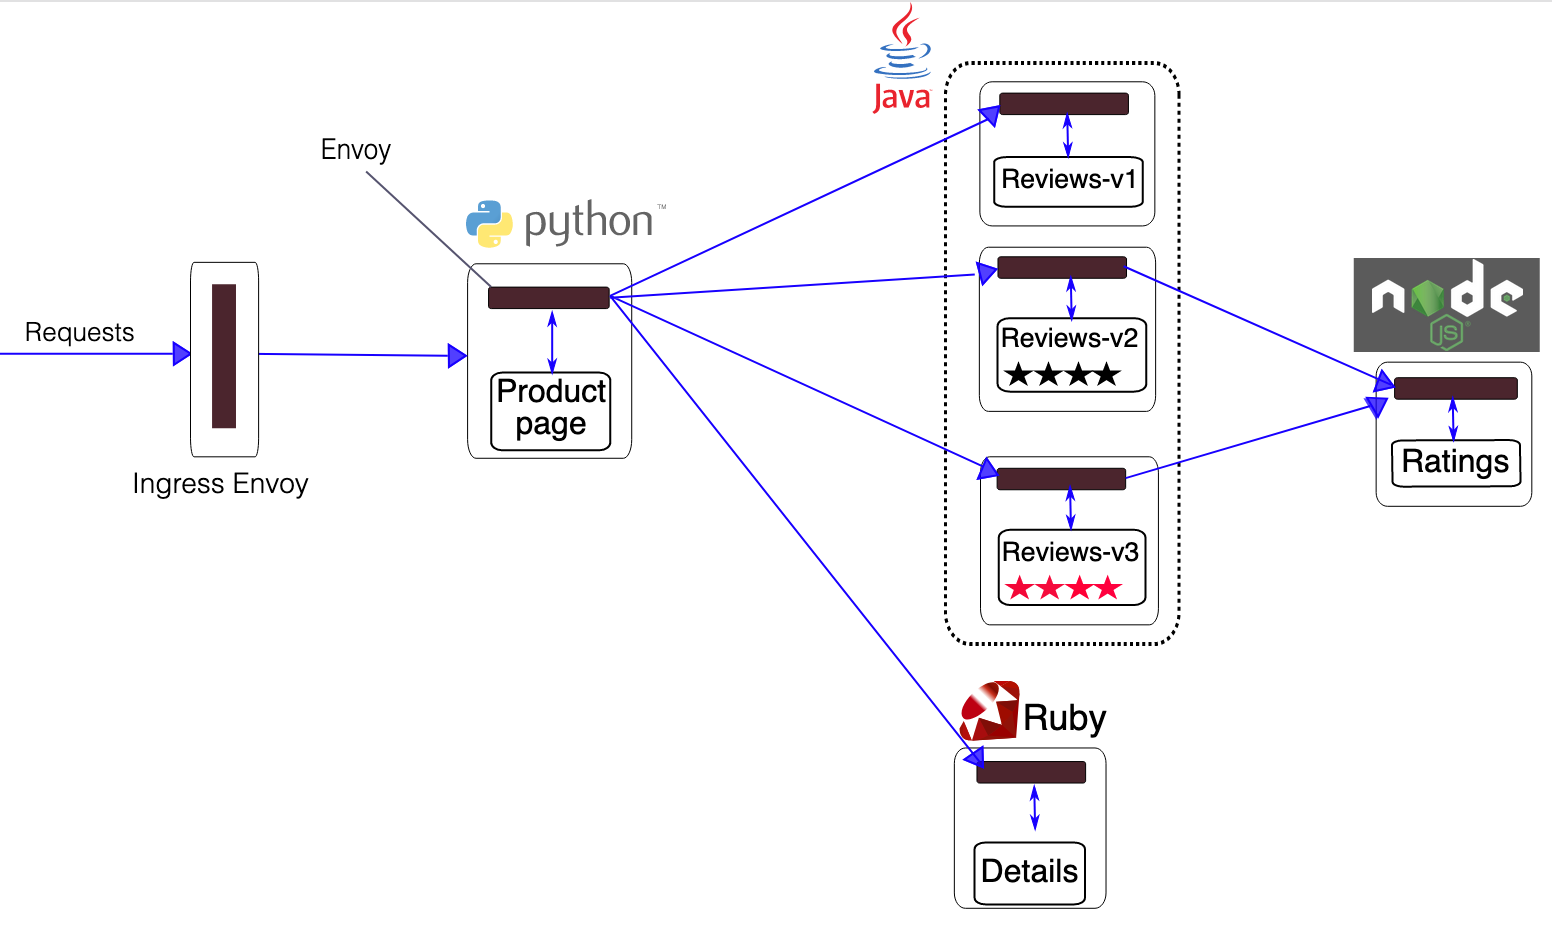
Architecture of the Bookinfo application

The Bookinfo application is broken into four separate microservices:
-
productpage
- The productpage microservice calls the details and reviews microservices to populate the page.
-
details
- The details microservice contains book information.
-
reviews
- The reviews microservice contains book reviews. It also calls the ratings microservice.
-
ratings
- The ratings microservice contains book ranking information that accompanies a book review.
There are 3 versions of the reviews microservice:
-
Version v1
- doesn’t call the ratings service.
-
Version v2
- calls the ratings service, and displays each rating as 1 to 5 black stars.
-
Version v3
- calls the ratings service, and displays each rating as 1 to 5 red stars.
Deploy the Sample Apps
Now we will deploy the Bookinfo application to review key capabilities of Istio such as intelligent routing, and review telemetry data using Prometheus and Grafana.
kubectl -n bookinfo apply \
  -f ${HOME}/environment/istio-${ISTIO_VERSION}/samples/bookinfo/platform/kube/bookinfo.yaml
Let’s verify the deployment
kubectl -n bookinfo get pod,svc
Create an Istio Gateway
Now that the Bookinfo services are up and running, you need to make the application accessible from outside of your Kubernetes cluster, e.g., from a browser. An Istio Gateway is used for this purpose.
We’ll define the virtual service and ingress gateway.
kubectl -n bookinfo \
 apply -f ${HOME}/environment/istio-${ISTIO_VERSION}/samples/bookinfo/networking/bookinfo-gateway.yaml
This may take a minute or two, first for the Ingress to be created, and secondly for the Ingress to hook up with the services it exposes.
To verify that the application is reachable, run the command below, click on the link and choose open.
export GATEWAY_URL=$(kubectl -n istio-system get service istio-ingressgateway -o jsonpath='{.status.loadBalancer.ingress[0].hostname}')
echo "http://${GATEWAY_URL}/productpage"

Click reload multiple times to see how the layout and content of the reviews changes as different versions (v1, v2, v3) of the app are called.