Sidecar Injection
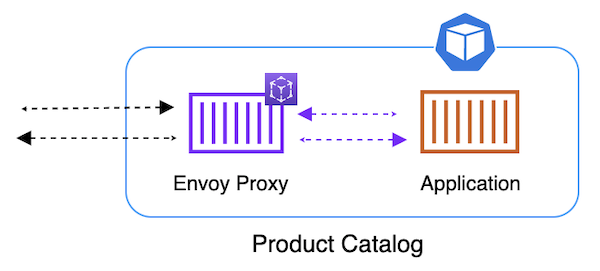
For a pod in your application to join a mesh, it must have an Envoy proxy container running sidecar within the pod. This establishes the data plane that AWS App Mesh controls. So we must run an Envoy container within each pod of the Product Catalog App deployment. For example:

This can be accomplished a few different ways:
-
Before installing the application, you can modify the Product Catalog App
Deploymentcontainer specs to include App Mesh sidecar containers and set a few required configuration elements and environment variables. When pods are deployed, they would run the sidecar. -
After installing the application, you can patch each
Deploymentto include the sidecar container specs. Upon applying this patch, the old pods would be torn down, and the new pods would come up with the sidecar. -
You can enable the AWS App Mesh Sidecar Injector in the meshed namespace, which watches for new pods to be created and automatically adds the sidecar container and required configuration to the pods as they are deployed.
In this tutorial, we will use the third option and enable automatic sidecar injection for our meshed pods. We have enabled automatic sidecar injection by adding label Labels: appmesh.k8s.aws/sidecarInjectorWebhook=enabled on the prodcatalog-ns namespace when we created the mesh resources in previous chapter, but this was done after initial pod creation. Currently, our pods each have one container running.
kubectl get pods -n prodcatalog-ns -o wide
To inject sidecar proxies for these pods, simply restart the deployments. The controller will handle the rest.
kubectl -n prodcatalog-ns rollout restart deployment prodcatalog

kubectl -n prodcatalog-ns rollout restart deployment proddetail

kubectl -n prodcatalog-ns rollout restart deployment frontend-node
Get the Pod details. You should see 3 containers in each pod main application container, envoy sidecar container and xray sidecar container
It takes 4 to 6 minutes to restart the Fargate Pod
kubectl get pods -n prodcatalog-ns -o wide
Get Running containers from pod
We can see that there are two sidecar containers envoy and xray-daemon along with application container frontend-node
POD=$(kubectl -n prodcatalog-ns get pods -o jsonpath='{.items[0].metadata.name}')
kubectl -n prodcatalog-ns get pods ${POD} -o jsonpath='{.spec.containers[*].name}'; echo